
Note: This post has been updated to include Model Year 2024 Airstream Touring Coaches.
Winterization is an important part of RV ownership if you store your Airstream in a place where winter temperatures drop below freezing. It’s always important to consult your manual before you do anything with your Airstream touring coach, but we've got plenty of info to help you drain the water out of your unit and to winterize it for the colder months.
If you would rather have a professional winterize your unit, any authorized Airstream dealer can assist you with this. If you'd rather tackle this process on your own, read on for our step-by-step guide to winterizing your Airstream touring coach.
Do I Need to Winterize My Airstream Touring Coach?
If you’ve ever known someone (or had the unfortunate circumstance of being the someone) who has had a pipe burst in the middle of winter, you understand the importance of making sure that your plumbing is ready for the colder weather.
Whether you have an Airstream Interstate or Atlas Touring Coach built on the Mercedes-Benz® chassis or the Rangeline Touring Coach built on the RAM ProMaster® 3500 chassis, the same is true. One of the most important steps of RV winterization is to make sure that your pipes do not freeze by flushing all of the water out of the lines.

But winterization is about more than simply protecting against frozen pipes. From removing food from storage cupboards to removing batteries for winter storage, we've got tips and housekeeping best practices that will ensure your coach is ready for new adventures once the weather warms up again.
The first step is to determine how much winterization you need to do. Many owners “winterize for use,” by blowing out all the water and maybe cycling RV antifreeze through the system – and continue to use their Airstream throughout the colder months. Others will store their Airstream and not use it until spring. If storage during the winter months is your plan, then the full winterization regimen should be followed.
Winterization Step 1: Level Your Unit
Ensuring your coach is level will allow the fluids to drain properly, as well as ensure safety during the entire process. You will want to ensure the coach is leveled from side to side as well as front to rear. Turn the water pump off, and disconnect the city water from your RV. If a level surface is not available, park the touring coach facing slightly uphill until water draining ceases and then downhill until water draining ceases.
Winterization Step 2: Open the Faucets
Open the hot and cold-water faucets throughout your Airstream touring coach. It’s important that both hot and cold are turned on to ensure that the system has been fully drained.
Winterization Step 3: Drain the Water Tank and Water Heater
Depending on your particular model, the access and process for draining these appliances differs slightly.
Airstream Atlas
Open the fresh water tank drain valve and water heater drain valve. The fresh water tank drain valve is located under the touring coach in front of the roadside wheels.
The water heater is located under the galley and accessed by removing the galley drawers. You will need to remove the service panel on the back of the water heater to access the drain valve for the water heater.
Airstream Interstate 24GT, Interstate 24GL, and Interstate 24X
Open the fresh water tank drain valve and water heater drain valve.
There are four fresh water low point drain valves that are located in different places depending on which model Airstream touring coach you own. Depending on the model, two are located either under teh galley (remove the lower drawer) or below the refrigerator (remove the vent below the fridge). Two more are located under the curbside lounge accessed by removing the cup holders.
The fresh water drain plug is located on the front of the fresh water tank under the touring coach. The water heater drain valve is located on the water heater under the roadside rear lounge or bed, and is accessed by removing the service panel.
Airstream Interstate 19 and Interstate 19X
Open the low point drain valves for cold water lines, the fresh water tank drain valve, and water heater drain valve.
The low point drain valves are in the curbside wheel well. The fresh water tank drain valves are on the front of the fresh water tank under the touring coach. The water heater drain valve is located by the water heater under the roadside ottoman and accessed by removing the service panel.
Airstream Rangeline
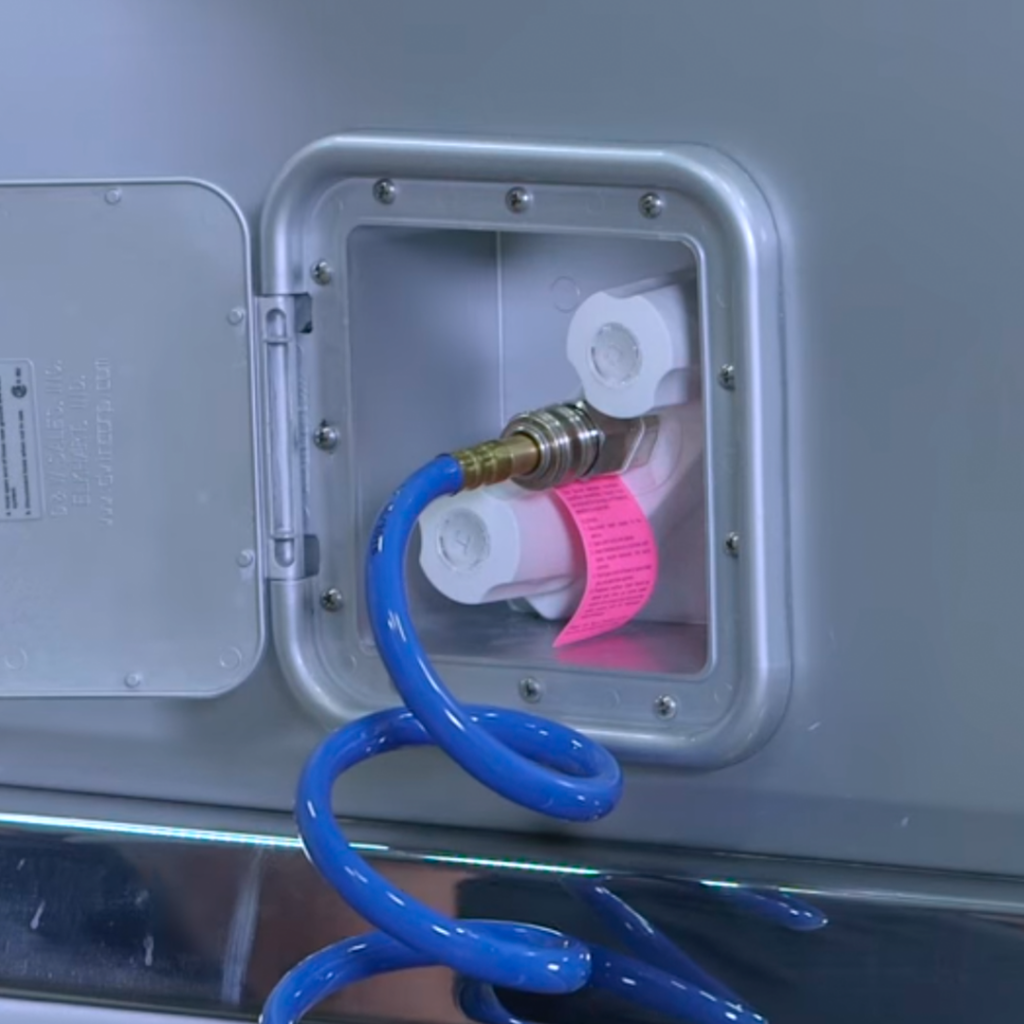
In addition to opening the hot and cold water faucets, you should also open the low-point drain valve and attach the quick connect hose/sprayer nozzle to the sprayer port in the water service compartment. Operate the nozzle to drain any remaining water and then disconnect the hose.
The Low Point Drain Valve drains both the fresh water system and fresh water tank from a single valve. To access, remove the vent cover from the curbside bed base. The water pump is located behind the large access panel on the face of the curbside bed base.
Allow all water to stop draining and proceed to the next step.
Winterization Step 4: Winterizing the Toilet
Turn off the touring coach’s water supply, drain the toilet bowl completely, and disconnect the supply line at the water valve. To avoid damage when using air pressure to blow water from the lines, make sure the toilet valve is in the open position. When you move to the next step of blowing out the water, it helps to have someone inside the coach opening and closing the toilet valve to let a bit of pressure build up and help blow the remaining water out.
*If water is frozen in the toilet, do not attempt to flush until the ice thaws.
While the water is draining from the systems, remove, drain, and store the wet bath and the exterior shower hoses and shower heads.
Winterization Step 5: Blowing out the Water
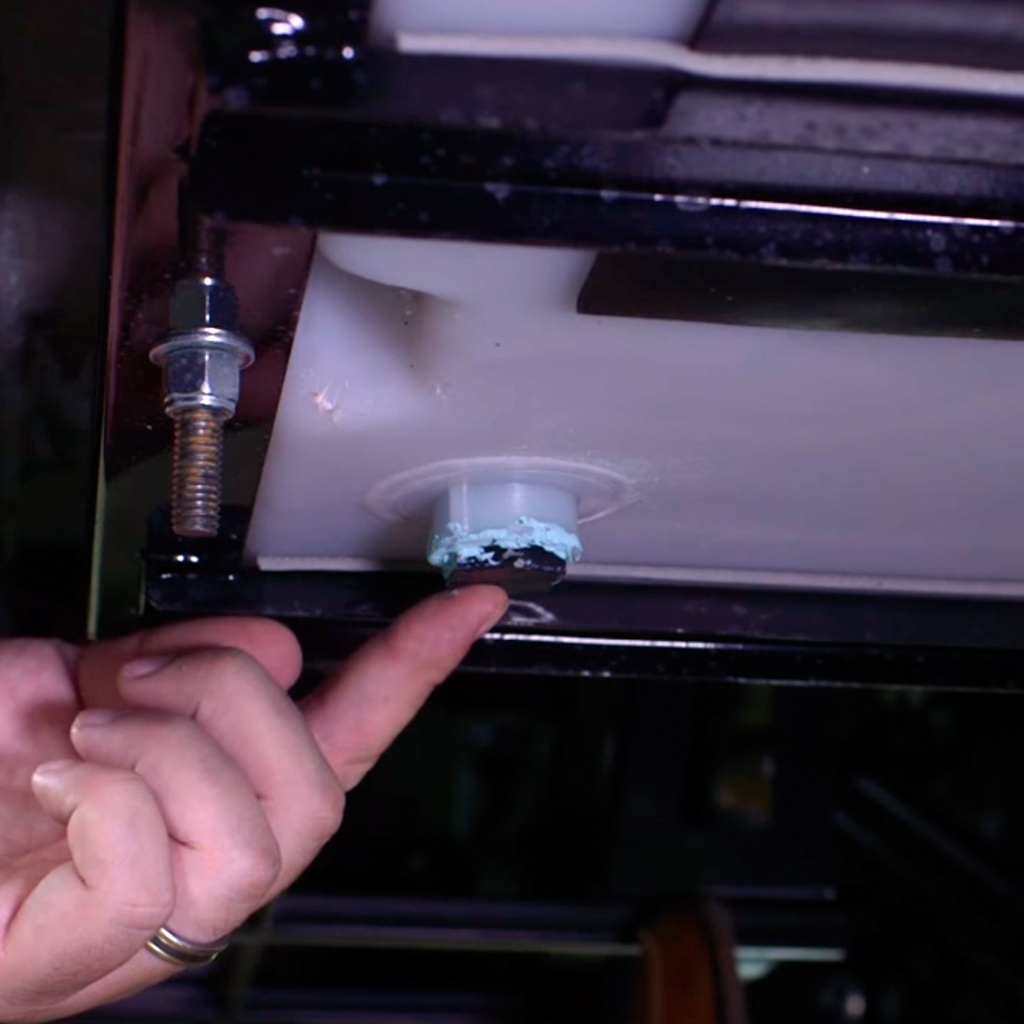
After the water has stopped running, it's time to start blowing out the remaining water using an air compressor. It's important to open the water heater bypass valve (set it to the BYPASS position) and ensure the water heater drain valve is open – if these steps aren't taken, it's possible to damage the water heater with too much air pressure.
Using an air compressor, apply at most 50 lbs. of air pressure at the city water inlet. Air fittings with regulators for the city water inlet can be purchased at most RV stores and also online at the Airstream Supply Company.
Be sure the toilet flush valve, toilet shut-off valve, all drain valves, and all faucets are open and the pump outlet hose is disconnected. Up to 50 lbs of air pressure can be accomplished only if the water heater bypass valve has been set to its bypass position. If the bypass valve isn't open and more than 30 lbs of pressure is used on the water heater, damage could occur.
Winterization Step 6: The Water Pump
For this step, it helps to have a catch pan or towel ready to place under the water pump to ensure water doesn't spill and cause a mess. Remove the quick-connect outlet fitting from the pump and turn the pump on briefly to pump out any remaining water from the pump head and lines.
Check the water pump strainer to be sure no water remains. There should be very little water if the tank has been drained. Leave the fittings disconnected from the pump until the system is ready to be used again. Leave a note on the water pump switch that the plumbing is not connected.
If you plan to use RV antifreeze in your winterization process, it's important to reconnect the the water pump.
Winterizing the Timberline System
The highly-efficient Timberline hot water and heating system is included in the Interstate 24X, the Rangeline Touring Coach, and any motorized Airstream with the optional E1 Package. Winterizing the Timberline system is easy and involves just a few simple steps. No winterization is required of the system coolant, but the domestic water circuit must be drained or protected using RV non-toxic antifreeze. Draining the domestic water system is accomplished by opening the low point drains and blowing air through the water system (check your manual for low point drain locations). Non-toxic RV antifreeze can be pumped through the system using the domestic water pump and opening both hot and cold valves at a plumbing fixture. Using this procedure does not require draining the Demand Hot Water exchanger.
Using RV Antifreeze to Winterize Your Airstream
An optional (but not necessary) method for winterizing protection is to add a non-toxic antifreeze (approved for drinking water system) to the water lines. All Airstream Touring Coaches have the ability to pump non-toxic RV antifreeze into the system, but depending on the model the winterization components are located in different positions.
In the Airstream Atlas Touring Coach, the Winterization Kit features a valve and hose and is located under the bathroom sink. It's accessed by opening the doors and removing the back panel.
In Airstream Interstate 19 Touring Coaches, the Winterization Kit features a valve and hose and is located behind the access panel on the rear of the galley, behind the sliding door.
In the Airstream Interstate 24 Touring Coaches, the Water Management Panel is behind the roadside exterior access door. Note that you will need a 1/2 inch diameter, tasteless, odorless, non-toxic hose with a standard garden hose thread designed for RV use.
In the Airstream Rangeline Touring Coach, the Winterization Valve and hose are behind the large access panel on the face of the curbside bed base.
How to Pump RV Anti-Freeze into the Sprinter Van System:
- Reconnect all lines except the one to the pump inlet port and close all drain valves.
- Turn the water heater bypass valve to its open position (see diagram below). The valve in the Airstream Atlas is located under the galley accessed by removing the drawers and in the Airstream Interstate the valve is located under the rear lounge on the curbside of the coach.
- Attach a length of hose to the water pump inlet port. This piece of hose should be long enough for the free end to be inserted into and reach the bottom of an RV non-toxic antifreeze container.
- Check that all interior water faucets are still open.
- Insert the hose into the container containing, RV non-toxic antifreeze, turn the pump on, and run the water pump until the RV non-toxic antifreeze solution fills all water lines and flush the toilet.
- Open the exterior shower faucet until RV non-toxic antifreeze comes out of the hose, shut off the valve, and remove the drain valve/hose assembly.
- Close the water fixtures as the RV non-toxic antifreeze begins to come out. Shut off the pump when RV non-toxic antifreeze has been distributed throughout the system, and then reopen all faucets to relieve pump pressure.
- Disconnect the hose length from the pump inlet fitting and reconnect the water system inlet line.
How to Pump RV Antifreeze into the RAM ProMaster System:
- RECONNECT all lines and CLOSE all drain valves.
- Ensure the external sprayer port hose is disconnected.
- OPEN the sink and shower drains if they are closed.
- Ensure all the water faucets and shower heads, hot and cold, are OPEN.
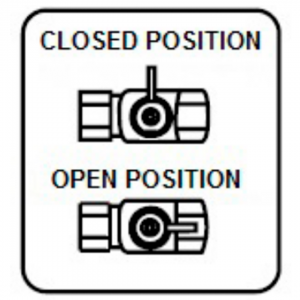
- SET the winterize valve selector to “winterize” by rotating it clockwise.
- Uncoil the hose connected to the winterize valve and place it in the RV antifreeze container.
- Turn the water pump ON and run it until antifreeze starts coming out of the faucets. Once antifreeze is running from the taps you can start closing them. Move from one fixture to the next, shutting them off as you go until all the lines are full. Turn the pump OFF as you empty and transition from one antifreeze container to the next.
- Allow the antifreeze to flow down drains. Flush the toilet and allow antifreeze to flow down the toilet. If equipped, work the hand shower sprayer while holding it down in the shower until antifreeze is coming out. Dump any remaining small amounts of antifreeze down a drain.
- Shut the water pump OFF once all the lines are full.
- OPEN all the faucets and leave them open. WARNING: Remove all RV antifreeze spillage from all sinks, drain pans, and faucet parts after winterizing. Failure to do so could damage surface finishes. Do not use water to rinse antifreeze down the drain as it will dilute the antifreeze.
Additional Tips for Winterization
Water Heater Winterization
If the touring coach is to be stored during winter months, the water heater system must be drained to prevent damage from freezing. Once drained, RV non-toxic antifreeze can be added.
- Turn off electrical power to the water heater by using the water heater’s control panel, located above the lavy sink for the Airstream Atlas or on the Multiplex touch screens in the Airstream Interstate, or by removing the fuse.
- Shut off the gas supply to water heater.
- Turn off the water pump.
- Open both hot and cold-water faucets.
- Remove the water heater’s service panel to access the drain valve. In the Airstream Atlas, the water heater is located under the galley and accessed by removing the galley drawers. In the Airstream Interstate it's located under the lounge or bed for twin models on the curbside.
- Turn the drain valve knob clockwise to drain and then clockwise again to close.
*The system will need to be refilled with water and all air removed from lines before the unit will re-light.
Black & Gray Water Tank Winterization
Plan your winterizing and storage ahead and be sure the holding tanks are drained and flushed thoroughly. This is very important, as frozen sewage and water could seriously damage the system.
After dumping the tanks, add a quart or two of RV non-toxic antifreeze to one of the holding tanks and start the macerator pump. Run the pump until the RV non-toxic antifreeze comes out the end of the pump hose. Leave the dump valves open.
As extra protection, open the toilet valve and add a quart of RV non-toxic antifreeze to the Black Water tank and into a sink drain to protect the holding tanks, valves, and pump.
Removing the Battery for Winter
Remove the house batteries from your touring coach and store in a cool dry place where there is no danger of freezing.
It is very important for the optimum life of your battery to check it periodically and to keep it fully charged (use a battery tender to ensure the best health for your batteries). This is especially true in winter months, when the temperature may drop below freezing. If the period of storage is for 30 days or less, you may turn off the battery disconnect switch rather than remove the battery. Continue to check and recharge the battery as needed, at least weekly in severe weather.
Winterizing your Airstream Touring Coach is a vital part of ownership. Keeping the coach in good working order and preparing it for colder climates is essential to enjoying your Airstream Touring Coach for years to come. You can also watch this helpful video on how to winterize your Airstream Touring Coach.
Always consult an Airstream technician or Airstream Customer Service for specific questions regarding this process or any other maintenance you might attempt.


